
When you upload a package to Jamf Pro, and you are using a JCDS as a distribution point, a manifest file gets automatically created. If your environment uses an HTTPS server that is NOT a Jamf Pro HTTPS-capable distribution point to host your packages, the requirements are to create a custom manifest file and upload it along with the Signed Distribution Package into Jamf Pro.
Before we start with covering the manifest file, I want to highlight that we need a Signed Distribution Package. This package must be signed using a certificate that is trusted by the device at the time of enrollment. You can use a certificate generated from either the Apple Developer account or from the Jamf Pro built-in certificate authority (CA) see below instructions.
How to create a Signing Certificate
Once you have the signing certificate, you can build a Signed Distribution Package. Who else rather than Scripting OS X can explain this best? Here you can find his great instruction.
How to Build a Signed Distribution Package
Use a GitHub Repo
After we have built the signed distribution package we need to make sure we can deploy the package during Automated Device Enrollment, by publishing to an open HTTPS distribution point. In this example, we are going to use GitHub as a HTTPS distribution point.
Within GitHub create a public repository, add a Folder and include the Signed Distribution Package you have created and want to deploy. Make sure this is committed/uploaded to the GitHub repository and that the repo is public!
To get the download URL you can easily go with the browser to the folder and click on the Signed Distribution Package.
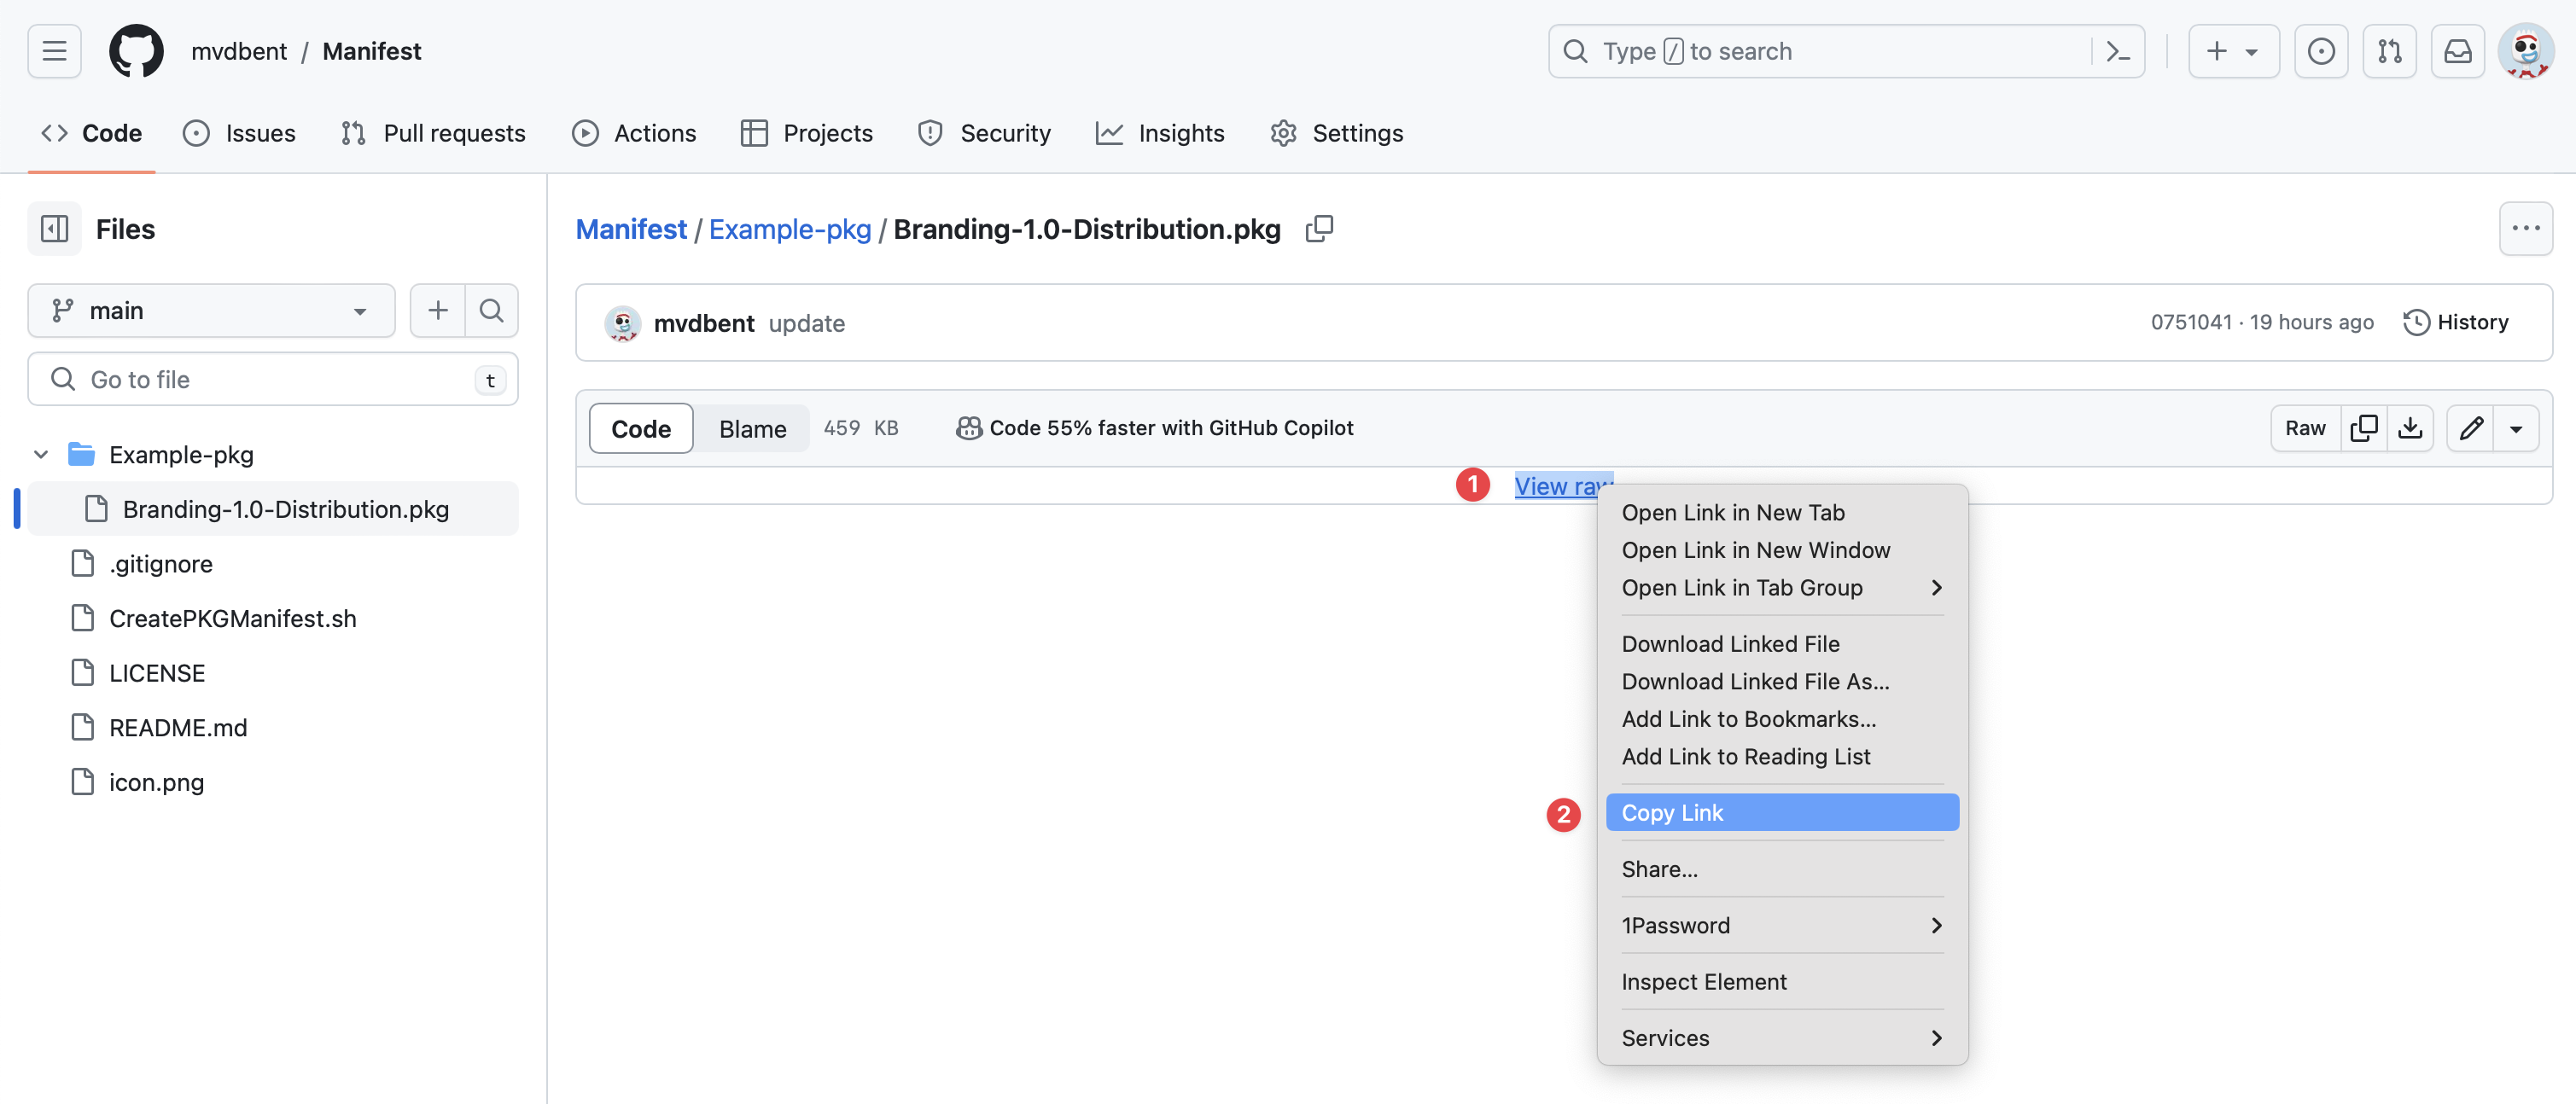
You can click on View raw and the package will download. If you Right+Click or Ctrl+Click on View raw you can select Copy Link. To get the download URL, which looks like this
https://github.com/mvdbent/Manifest/raw/main/Example-pkg/Branding-1.0-Distribution.pkg
which we need to create the manifest.
Generate Manifest
As I mentioned before, every Signed Distribution Package must have a corresponding manifest file. The manifest file is an XML property list (.plist file). This file contains the URL to download the package from an HTTPS server and other required information for the package. To use the package with a manifest, make sure that the website is accessible. Upload the package file (with a .pkg filename extension) to an area of your website where users have access.
The following fields are required in the file
- kind Must be set to
software-package - md5-size The size of the pkg in bytes
- md5s fingerprint (checksum) of the PKG
- URL The fully qualified HTTPS URL where to download the package
For more information about creating and hosting a manifest file, see the Preparing to distribute in-house macOS apps in Apple’s Deployment Reference for Mac - Distribute custom packages for Mac.
I have prepared a GitHub repository where you can find a script that creates a custom manifest.
/Library/Desktop Pictures/LockScreen.jpg
You can find and download the manifest GitHub repository here
To create a custom manifest we need to run the CreatePKGManifest.sh script and provide a path to a local Signed Distribution Package ($1) and a download URL($2) where the same package is available for download.
We need to type in the following command in the terminal
./CreatePKGManifest.sh /path/to/local/SignedDistributionPackage downloadURL
For this example we are using the Signed Distribution Package that’s included in the GitHub repo /example-pkg/Branding-1.0-Distribution.pkg.
To get the download URL you can easily go with the browser to the online repository go to the Example-pkg folder and click on the Signed Distribution Package Branding-1.0-Distribution.pkg.
To test if this package can be downloaded, you can click on View raw and the package will download. But now we only want to have the download URL, you can Right+Click or Ctrl+Click on View raw and here you can select Copy Link. The copied link will look like this
https://github.com/mvdbent/Manifest/raw/main/Example-pkg/Branding-1.0-Distribution.pkg
Now we have the needed info
- /path/to/local/SignedDistributionPackage
example-pkg/Branding-1.0-Distribution.pkg
- downloadURL
https://github.com/mvdbent/Manifest/raw/main/Example-pkg/Branding-1.0-Distribution.pkg
The terminal command will look like this
./CreatePKGManifest.sh example-pkg/Branding-1.0-Distribution.pkg https://github.com/mvdbent/Manifest/raw/main/Example-pkg/Branding-1.0-Distribution.pkg
Result
<!DOCTYPE plist PUBLIC "-//Apple//DTD PLIST 1.0//EN" "http://www.apple.com/DTDs/PropertyList-1.0.dtd">
<plist version="1.0">
  <dict>
    <key>items</key>
    <array>
      <dict>
        <key>assets</key>
        <array>
          <dict>
            <key>kind</key>
            <string>software-package</string>
            <key>md5-size</key>
            <integer>470308</integer>
            <key>md5s</key>
            <array>
              <string>9363ea8eabf5d50ddf6632119d4a3c7f</string>
            </array>
            <key>url</key>
            <string>https://github.com/mvdbent/Manifest/raw/main/Example-pkg/Branding-1.0-Distribution.pkg</string>
          </dict>
        </array>
      </dict>
    </array>
  </dict>
</plist>
The script created in /Users/Shared/ the manifest.plist which included information like the kind
            <key>kind</key>
            <string>software-package</string>
the md5-size of the pkg in bytes
            <key>md5-size</key>
            <integer>470308</integer>
the md5s fingerprint (checksum) of the PKG
            <key>md5s</key>
            <array>
              <string>9363ea8eabf5d50ddf6632119d4a3c7f</string>
            </array>
and the fully qualified download URL where you can download the package
            <key>url</key>
            <string>https://github.com/mvdbent/Manifest/raw/main/Example-pkg/Branding-1.0-Distribution.pkg</string>
Now we have we need to deploy the Branding-1.0-Distribution.pkg package during enrollment with the just created custom manifest file.
Upload Package and manifest into Jamf Pro
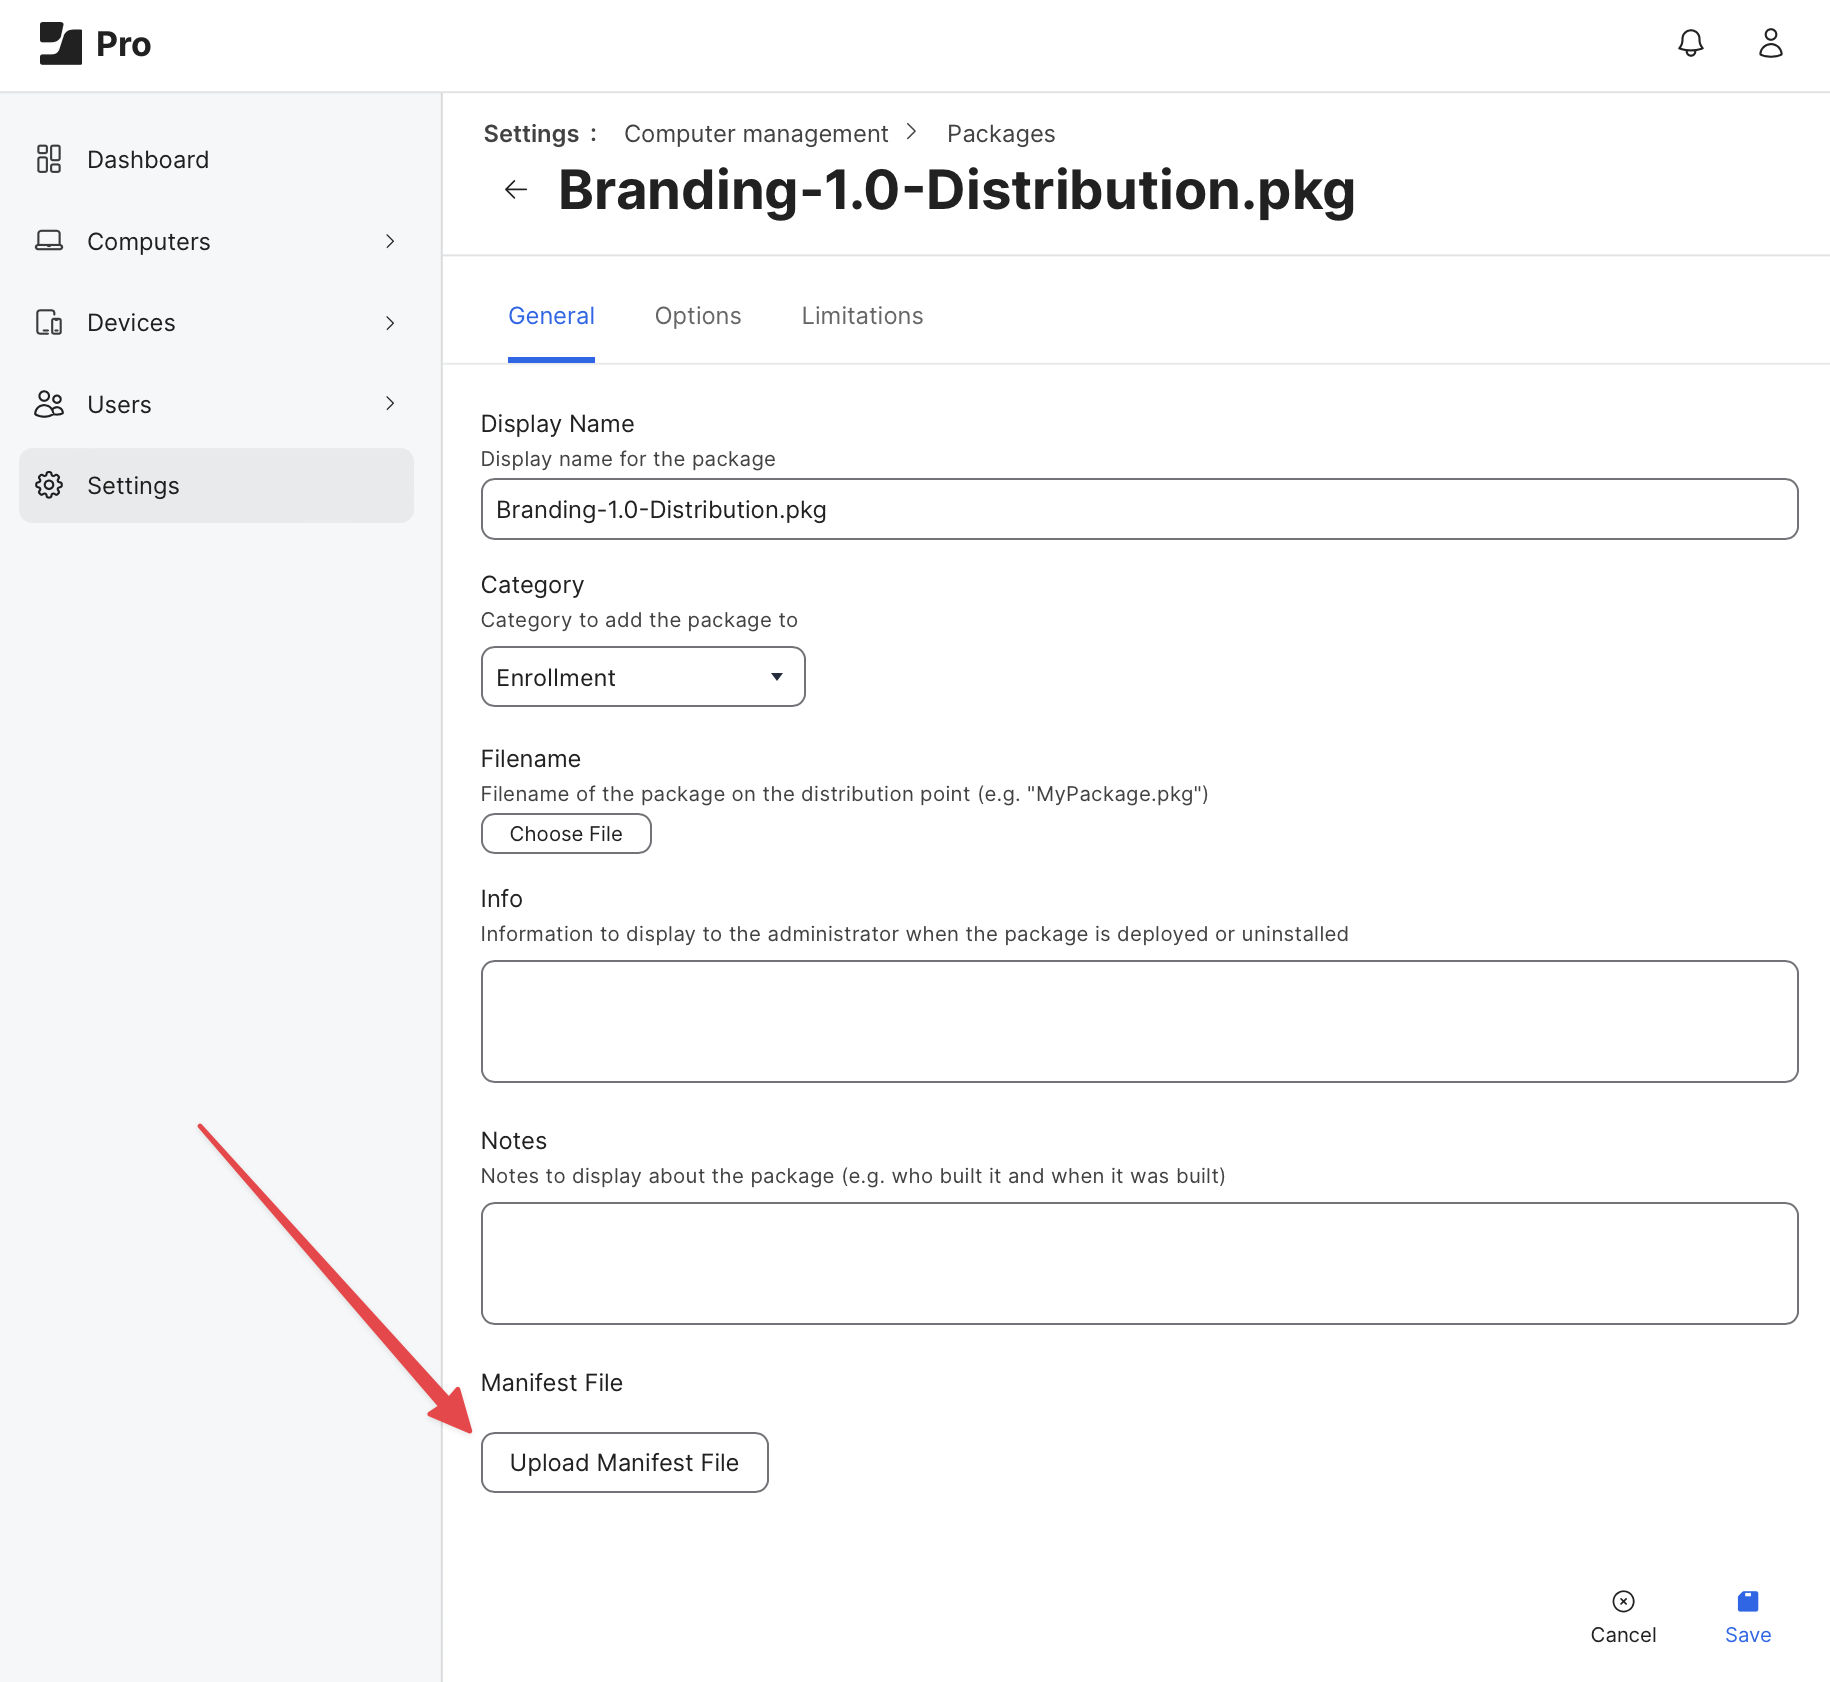
You still need to upload the Branding-1.0-Distribution.pkg package into Jamf Pro so you can select this within the prestage. The only thing you need to add to the package is the manifest file.
Go to Settings -> Computer management -> Packages and select Branding-1.0-Distribution.pkg click on Edit. Upload the custom manifest file and Save.
The next step is to create a pre-stage and add the Branding-1.0-Distribution.pkg package to the enrollment packages.
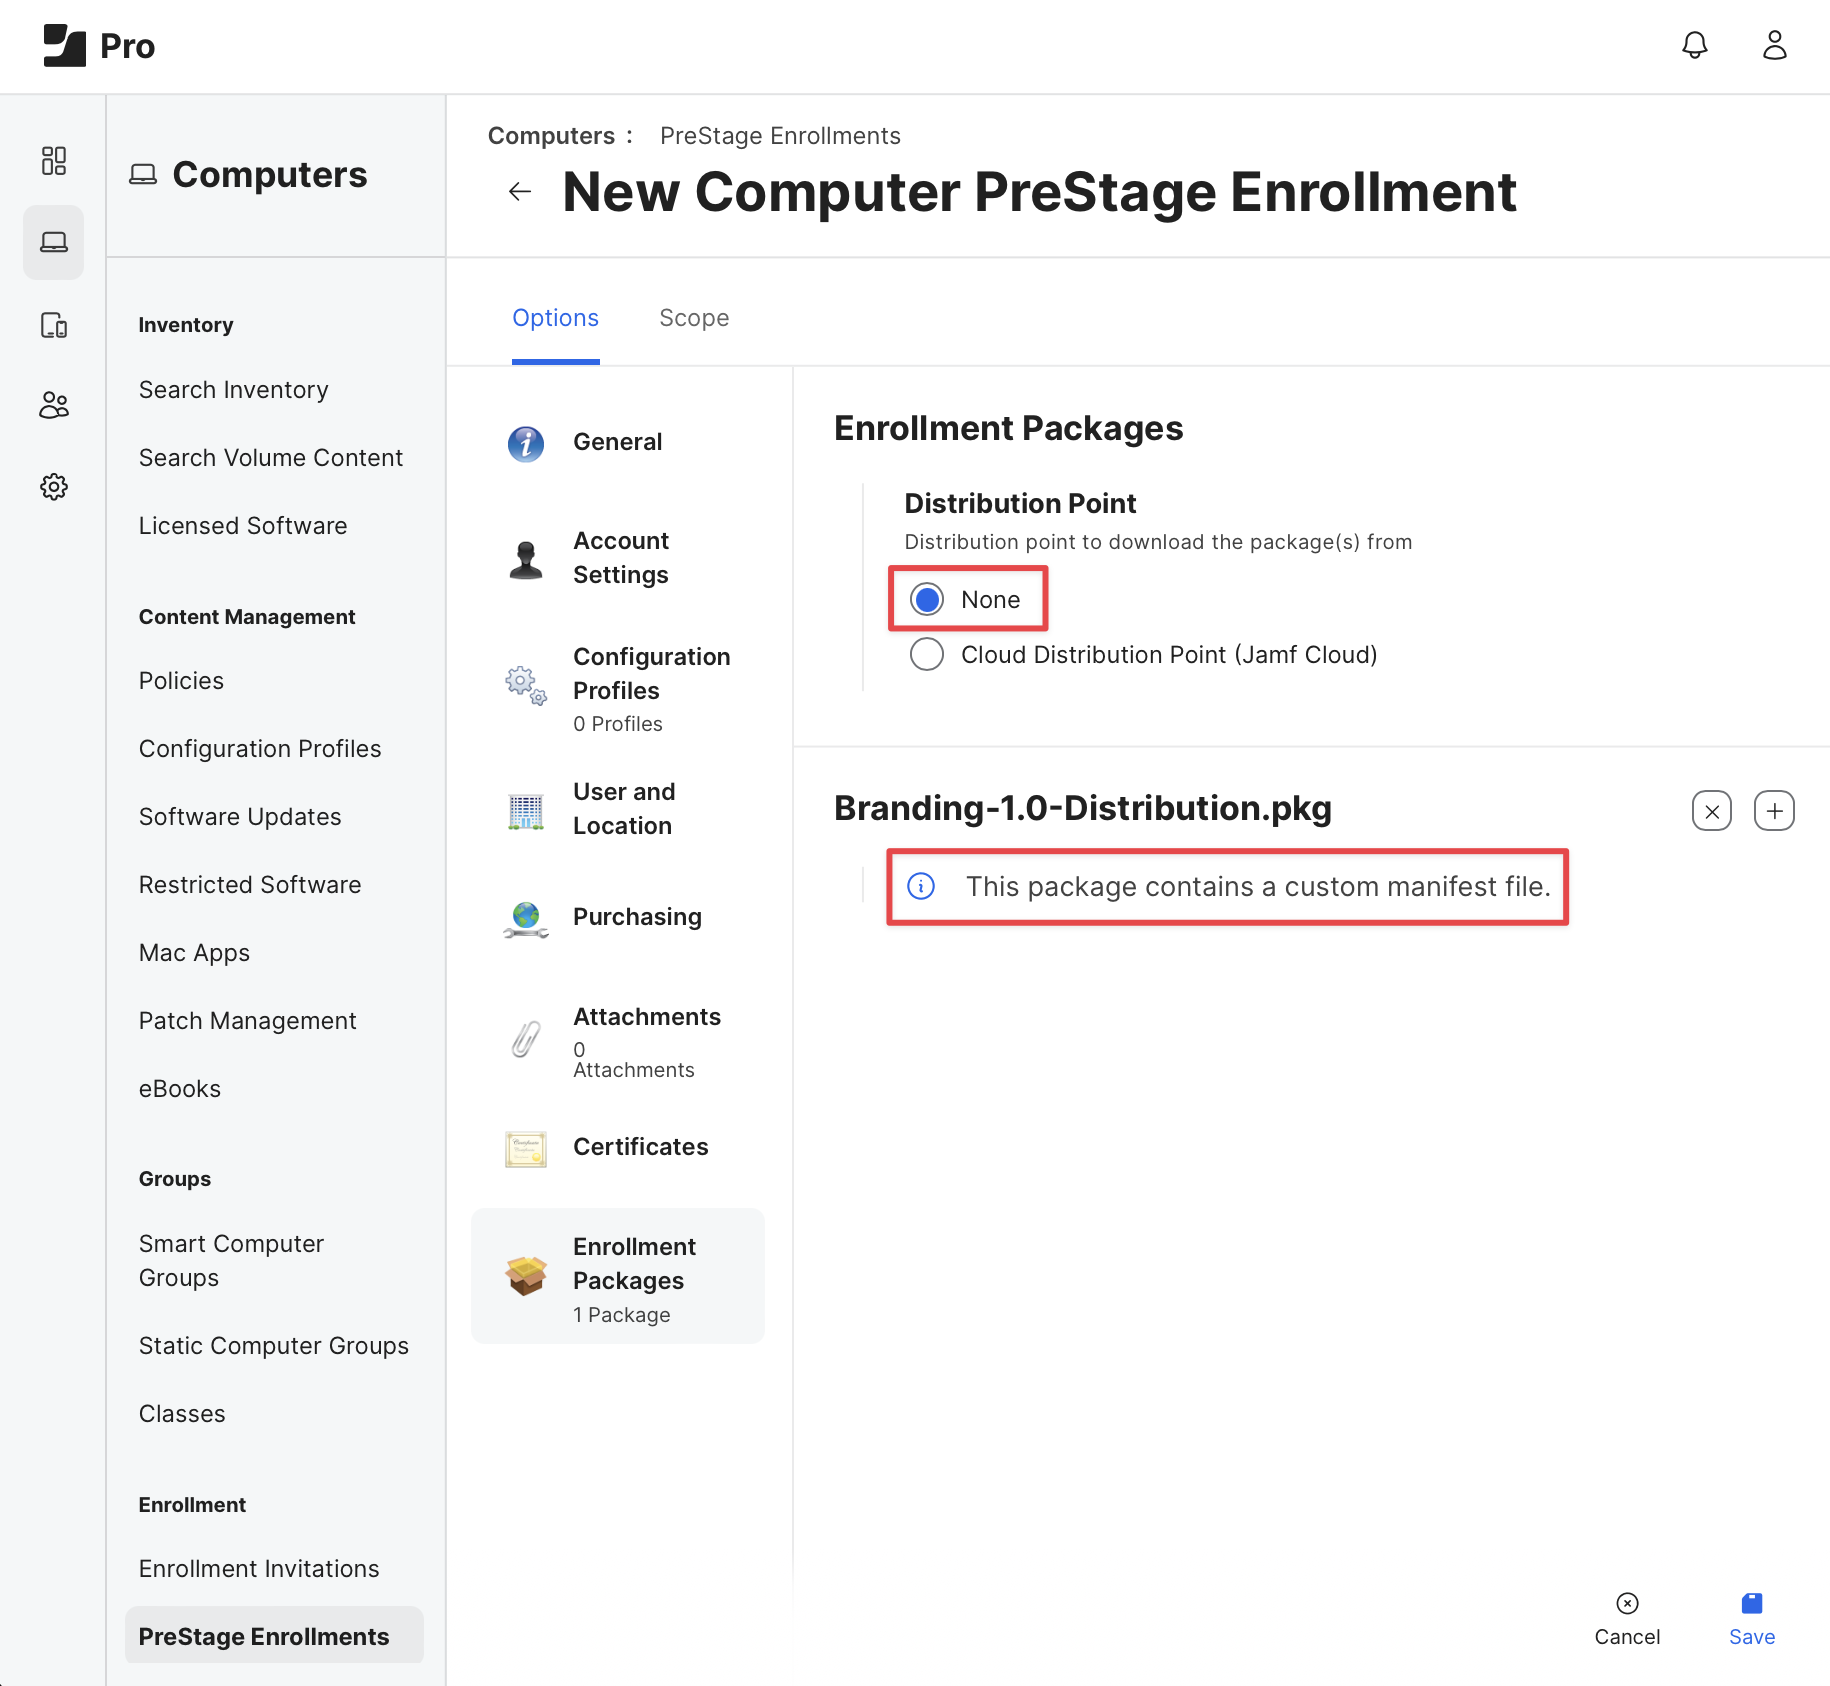
Go to Computers -> PreStage Enrollments open an existing or create a new PreStage.
Go to the payload Enrollment Packages and add the Branding-1.0-Distribution.pkg package.
You can leave the Distribution Point on “None” because we use the download URL which is included in the manifest of the Branding-1.0-Distribution.pkg package.
To verify if you have the right package you must see a note below the package that says This package contains a custom manifest file.
Note Only add packages that are essential to the enrollment user experience to a PreStage enrollment. Too many packages may cause unexpected enrollment issues or take additional time to download if there is a poor network connection.
The only thing for you to do is test, test test!
Test your deployment workflow and check if the package will be installed on the device you are enrolling.
If you want to check if the installation of the Branding-1.0-Distribution.pkg package is successfull, you can filter the log events in the terminal, by running the following command
log show --info --debug --predicate 'subsystem == "com.apple.ManagedClient" AND category == "MCXToolsInterface"' --last 1h | grep com.jamf.ce.Branding
As you can see I used the grep argument with the bundle identifier from the package to easy search. If you want to see more logs, just simply remove the category part AND category == "MCXToolsInterface" from the command to get more logs.
Or use the /Applications/Utilities/Console.app and search the install.log and you can always just simply look up the files, or application you want to install.
If you used the Example package Branding-1.0-Distribution.pkg you can check if the image is installed at this location /Library/Desktop Pictures/LockScreen.jpg.
Thats it!
Hope you liked the post!